
You probably have content: PowerPoint slides, videos, handouts. Maybe your event coordinator asked for some images, or a copy of the script you’re working from.
If you’re working with me at GoodClix, your organization’s event Producers probably want an ADVANCE copy to review. Your event Technical Director (that’s me) wants a FINAL copy so if there are any glitches, I can display your content for you, and let you focus on speaking to the people glued to their screens. And if I’m creating any videos or other assets for you, I might have requested some items from you.
There are several ways to get the information to us. My preferred method of getting your files is by using a “DropBox Request” which is a link to a web site where you drop in files that I requested.
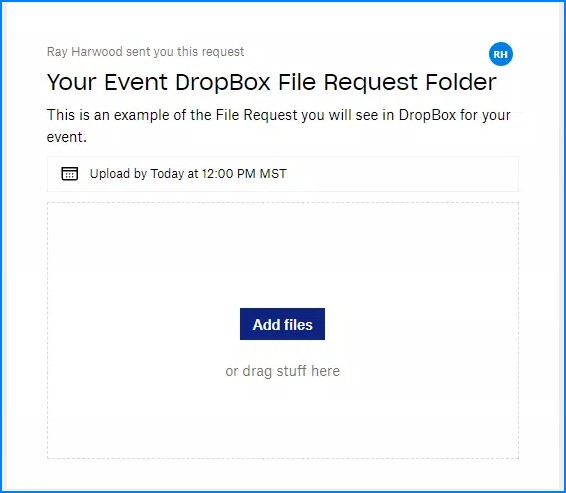
You should receive some event-specific information from someone: your organization’s event producer, or me as the Technical Director — whoever is collecting all of the files. There should be a link/URL for a “DropBox Request” folder, specific to your event. There’s a sample link below… but it’s fake. Fake link alert! Use the real link from your event coordinator. If you’re not sure, please ask.
Step #1: Collect/Select Your Files
If you’re just uploading one file – easy stuff! But if you’re uploading many files and you can put them all in one folder on your computer, that might make it a little easier for you — both in the upload process, but also on the day of the event. If your files are scattered around on your computer, just know where they are before you get started.
Step #2: Name Your Files Appropriately
We need to be able to identify which file belongs to which presenter and which session. It helps if the file names you use are descriptive, so if we’re receiving many files (and especially if we’re receiving many files from you), we can easily tell which is which. Take some time before you upload your files and see if renaming them with more descriptive titles would help us (and you) during the event.
Step #3: Drop It Online Into a DropBox Request
Someone from your event will provide you the “File Request URL” for the DropBox folder where files are to be dropped. If you have that URL (web address) and you’re accustomed with dragging and dropping folders, do your thing! But if you need them, here’s more detailed instructions.
- You will receive a link to the DropBox folder that looks something like this: (Don’t use this link! It’s just an example! Use the link provided by your event staff.)
https://www.dropbox.com/request/YUg44MbjCrB3grtd59Qi - Click on that DropBox link to open it in your web browser. You should see something like this on the web page:
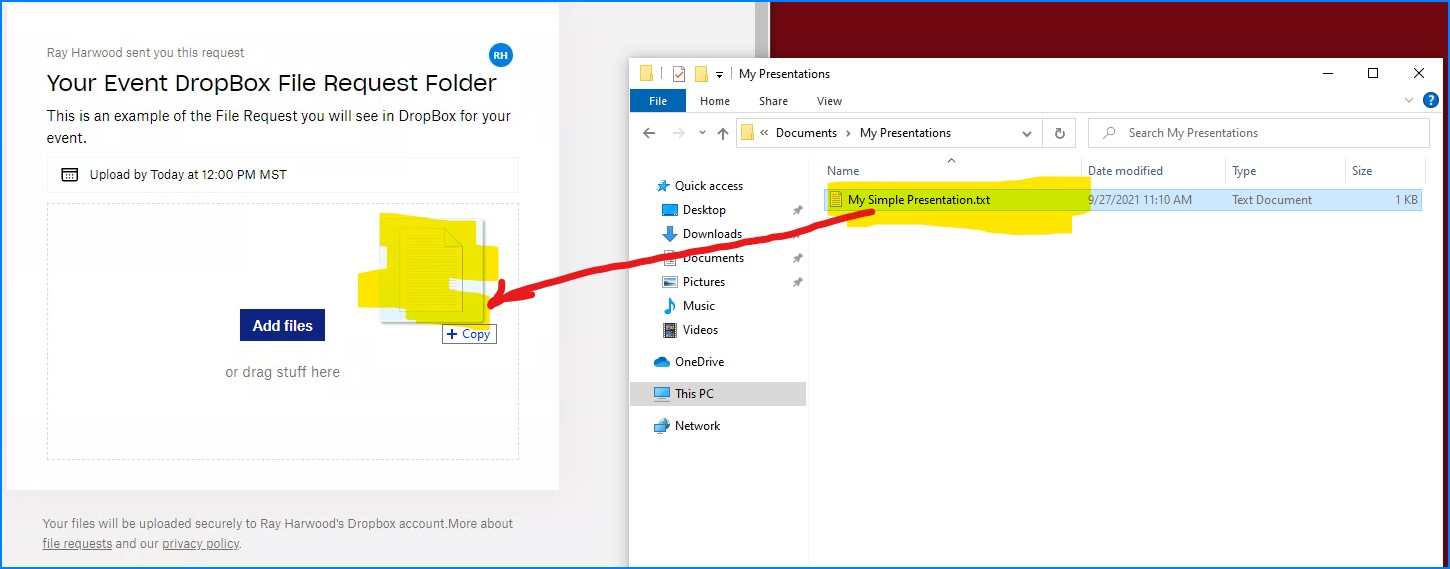
Leave that web page where it is, and if possible, also make sure the folder with your files is also visible on your computer screen. - Copying your files to the DropBox “drop zone” is done by dragging the files from your folder over the the “Add Files or drag stuff here” area shown above. Once you grab the file (or files… you can drag them all at one time, or individually), move them toward the DropBox web page, the mouse icon should say “+Copy” to let you know that you’re not going to lose your original — you’re just making a copy into DropBox. It should look something like this:
- You can continue to add additional files that are needed for your event. Once you have finished “dragging and dropping” your files, click the blue Upload button that appears. If you already have a DropBox account and are signed in, that’s it! If you do not have a DropBox account – no worries, you don’t need to get one, but DropBox will ask you for your name and email address.
It is helpful to send an email to your event staff letting them know you have put a copy of your content in DropBox. Please include the names of your files!
What Happens Next
All event files are stored in DropBox for easy sharing among the event production staff. DropBox will put the copy of your file into a special folder, and add some additional information to the filename, like the date it was uploaded, and your name. Once your file is uploaded, event staff may add additional information to the file name, including which such as the Day and which Session of the day your file is scheduled to be used.
Example: You’re Marta Jones, presenting at a 3-day conference on Self-Care, and you have a PowerPoint presentation to use during your session. You’ve named your file “HowToRelaxInThreeEasySteps.pptx” and you uploaded it September 10, 2024. Your session is on the second day of the conference, and the third session of the day. It will be stored on DropBox with the following filename.
D2S03-2024-09-10-MartaJones-HowToRelaxInThreeEasySteps.pptx
We’ll be able to easily identify what session it is to be used in, what date this version of the file was received, who sent it, and the descriptive name of the file.
If You Have Problems…
Don’t let this process frustrate you! If you have problems, contact your event staff for assistance, and they will either help you directly, or put you in touch with your production team to work with you. If we can easily get you going down the path using DropBox, we will. Otherwise we’ll work some magic to make it happen.