
This is what you wanted… to be selected as a presenter. You’ve done your research, you’ve reached a conclusion, you’ve made your slides, you’ve rehearsed your speech… and now it’s time to start Screen Sharing your PowerPoint presentation, and you’re all thumbs!
Note: Zoom also has this Zoom Support article you might look at too: https://support.zoom.us/hc/en-us/articles/203395347-Screen-sharing-a-PowerPoint-presentation
Trust me, it happens to everyone at first. (It’s one of the reasons I always ask for backup copies of all presentations, so I can jump right in there and Screen Share for you, so you can tell the audience what you came to tell them today!)
There are several things that will help you along the path to Screen Share Nirvana.
Practice, Practice, Practice
I can’t stress enough the importance of doing this several times – maybe many times – before showtime. Get your own Zoom account and do it on your own. Invite a friend and do it again. Then do it some more, until you can confidently say, “I’ve got this.”
Unless, of course, you get frustrated in the process. Then I recommend having a Zoom Guru (like me- but doesn’t have to be me, if you know someone else) assist you. Sometimes a little guidance at the right time goes a long way to confidence building.
And if there is a “rehearsal” or “practice” day set up for your event, go. Practice there in front of your peers. No pressure, you’ll do fine! And I’ll be there to guide you.
Also, be very familiar with the rest of the hints below.
There’s a Process – Follow It!
Some people never get the hang of Screen Sharing because they never approach it the same way every time. The process isn’t horribly difficult, but there are some minor technical techniques you’ll want to know about. I’d suggest you make a small note care with the 5 steps on it.
Step 1: Start the PowerPoint Slide Show
First, always start your PowerPoint Presentation first! It can just sit there waiting for you. You can even start it before you join the meeting, if you like.
And this might sound counter-intuitive, but also start your slide show! Either fiddle around and locate the button on the top menu bar, or take the easy way out and press F5, which — if you are on your regular PowerPoint screen — will simply start your slide show. Yes, F5 starts the slide show, from the beginning.
Step 2: Switch Back to Zoom
With your PowerPoint started, now you need to know how to swap back to the Zoom window. On a Windows computer, this is done by holding down the Alt key and pressing the Tab key. Tap Tab and release… but continue to hold down the Alt key. All of the windows that are available on your computer should be visible. Now you can tap the Tab key and watch the highlighted window change. Follow the bouncing window until you locate your Zoom window. It helps to look for the little Zoom icon, and next to it should be “Zoom Window”. That’s it! When the white selection box is over that window, let go of the Alt key.

Step 3: Click the green “Share Screen” Button
It’s the only green button on the bottom of the Zoom screen. Don’t click the little arrow/caret next to it; click the actual green button.

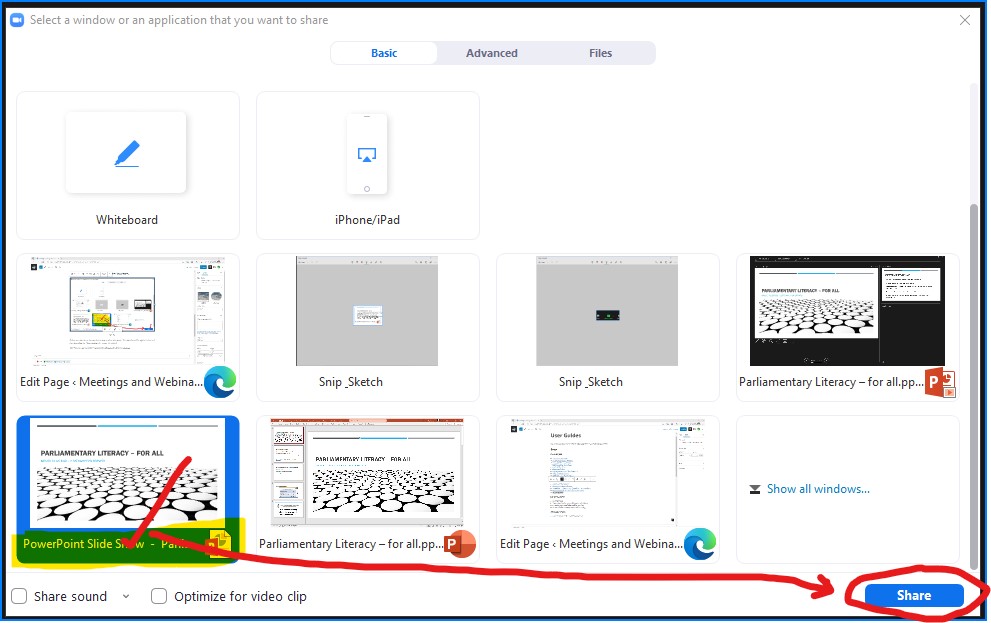
Step 4: Select the PowerPoint Slide Show Window
There will be multiple windows on the Share Screen screen with the PowerPoint logo on it — but they all look a little different. Click on the window that says “PowerPoint Slide Show”, possibly with other text behind it.
Step 5: Click the Blue “Share Button”
Believe it or not, this is the step that throws most people astray. They’ve selected the right window, and then they close the Share window. No… resist. Don’t do it.
The Sharing is not complete until the blue Share button has been clicked!
Step 6: Adjust If Needed
At this point, it seems like everyone has a different experience. Some people see their Zoom window –most people do not… they see their PowerPoint window. There are probably three PowerPoint windows available to you: the Slide Show, the slide editor window, and the “presenter’s view” that lets you advance the slides. You may have to “Alt-Tab” a few times to find the window that is right for you.
Seems to me like everyone learned PowerPoint a little differently. Some like the full Slide Show window, others like the Presenter’s Screen with icons, next slide, and notes.
You should be able to advance slides by one of many possible means, just keep in mind that one of the PowerPoint program windows has to be “the focus” — that is, the main window that Windows is displaying.
To advance slides, do any of these:
- Click directly on the Slide Show screen.
- Click one of the forward arrows, either on the Slide Show or Presenters screens
- Press the “right-arrow” button on your keyboard.
- Press the Enter key.
To go back a slide, do either of these:
- Press the Backspace key
- Press the “left-arrow” key
Now Breathe, Be Calm, and Be Ready
Yay! You did it! Now just relax and wait to be introduced.
Check your Audio is not muted, and that your camera video is on.
And smile… you’re a pro at this now!
Stopping Screen Sharing
When your presentation is done, if there’s time for Q&A, you probably won’t want your slides up. Let the audience see you — that’s why they’re here!
To stop screen sharing, locate the “mini-bar” that looks something like this:

Simply click the red “Stop Share” button, and you’re done!