
Sometimes you want to be seen and heard, sometimes just seen, sometimes just heard. Sometimes you just want to be able to get up and dance — without anyone watching or hearing. So you have to know about the two icons/menus that control audio and video… they’re down in the bottom left-hand corner of your Zoom window. If you don’t see them, move your mouse until the cursor (the pointy thing that probably looks like an arrow), down to the bottom of the Zoom screen and it should appear.
Side Note: Assuming that the Zoom window is “active” on the screen, you should be table to tap the Alt key (Control key for Mac) and bring the Zoom menu up semi-permanently — that is, until you tap the Alt key again.
Your Audio and Video icons can look like any of these:
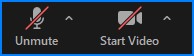
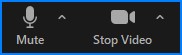
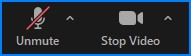
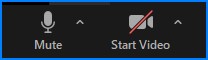
You’ll notice the red line indicates “this isn’t active”, and the lack of a red line generally means “this is active.” There are some cases where lack of a red line means “you don’t have any of these”, in which case, you might need a microphone, headset, speakers, or web camera.
You should also notice the little symbol just to the right of each of these icons — it looks like the caret or ^ symbol. You click this caret symbol to select different speakers, microphones, and cameras, and also to change various settings related to audio and video.
As you can see, there are check-marks in the left margin of each menu showing which of the items — Microphones, Speakers, and Cameras — are selected.
There are many options to choose from in the various menus at the bottom of each of these, but my recommendation for new folks is “don’t mess around with the settings until you know how to fix it if you mess something up.” That education is beyond the scope of these user guidelines, but there’s plenty of information out there to help you out, once you get that far.
Clean and Crisp, Please
Just a little bit of advice here on audio and video. Your time will be well spent experimenting with good microphone and camera placement, so that you can be heard and seen clearly. Consider a headset with an attached boom microphone which will cut our background noise and likely allow you to hear the audio much more clearly than with speakers.
Also experiment with camera placement. You want your face to be at least half of the vertical distance of your video, preferably more — and reasonably centered. If your face is a tiny speck on the video screen, or if the top of your head or the bottom of your chin is cut off (visually speaking, that is), then the overall presentation experience will not be as effective as you like. Take some time and work with camera placement. If you have a laptop, consider elevating the laptop so that the built-in camera isn’t getting a great shot of your ceiling.
Two Computers In One Room? No, Please.
If you are going to have two computers in the same room on the same Zoom Meeting or Webinar, you are likely to have a loud feedback problem if either one of the computers uses speakers, instead of headphones. Zoom’s noise canceling ability (and anyone else’s, really) can only detect and remove feedback between microphone and speakers on the same computer. Two sets of speakers is double trouble, but even one set of speakers will be a problem if the other person wants to talk on Zoom.
Two computers? Put them in separate rooms, or get headsets for both. You’ll be glad you did.